
Find appointment options
A customer on the phone asks "when can you come?" — the planner finds the times that fit the existing routes best, with the driving time beside each one.
A customer rings: "When can you come round?" Until now you looked for a gap in the calendar. But a gap is not the same as a good time: that free hour on Thursday may cost your colleague forty minutes of driving from the job before it, while on Tuesday there is a slot where they are already round the corner.
The planner turns the question around. You fill in what needs doing and where, and Schedulinq shows the times that fit best around what is already planned — with, for each one, who does it, how well it fits and how much driving it causes. It is the same arithmetic your booking page does for customers; the difference is that you now see why a time is good.
In short
- On the Calendar, click Find options.
- Pick the customer and the appointment type. The address comes from the customer record.
- Read the options on the right: time, who, score and driving.
- Click a row — the appointment form opens with everything filled in.
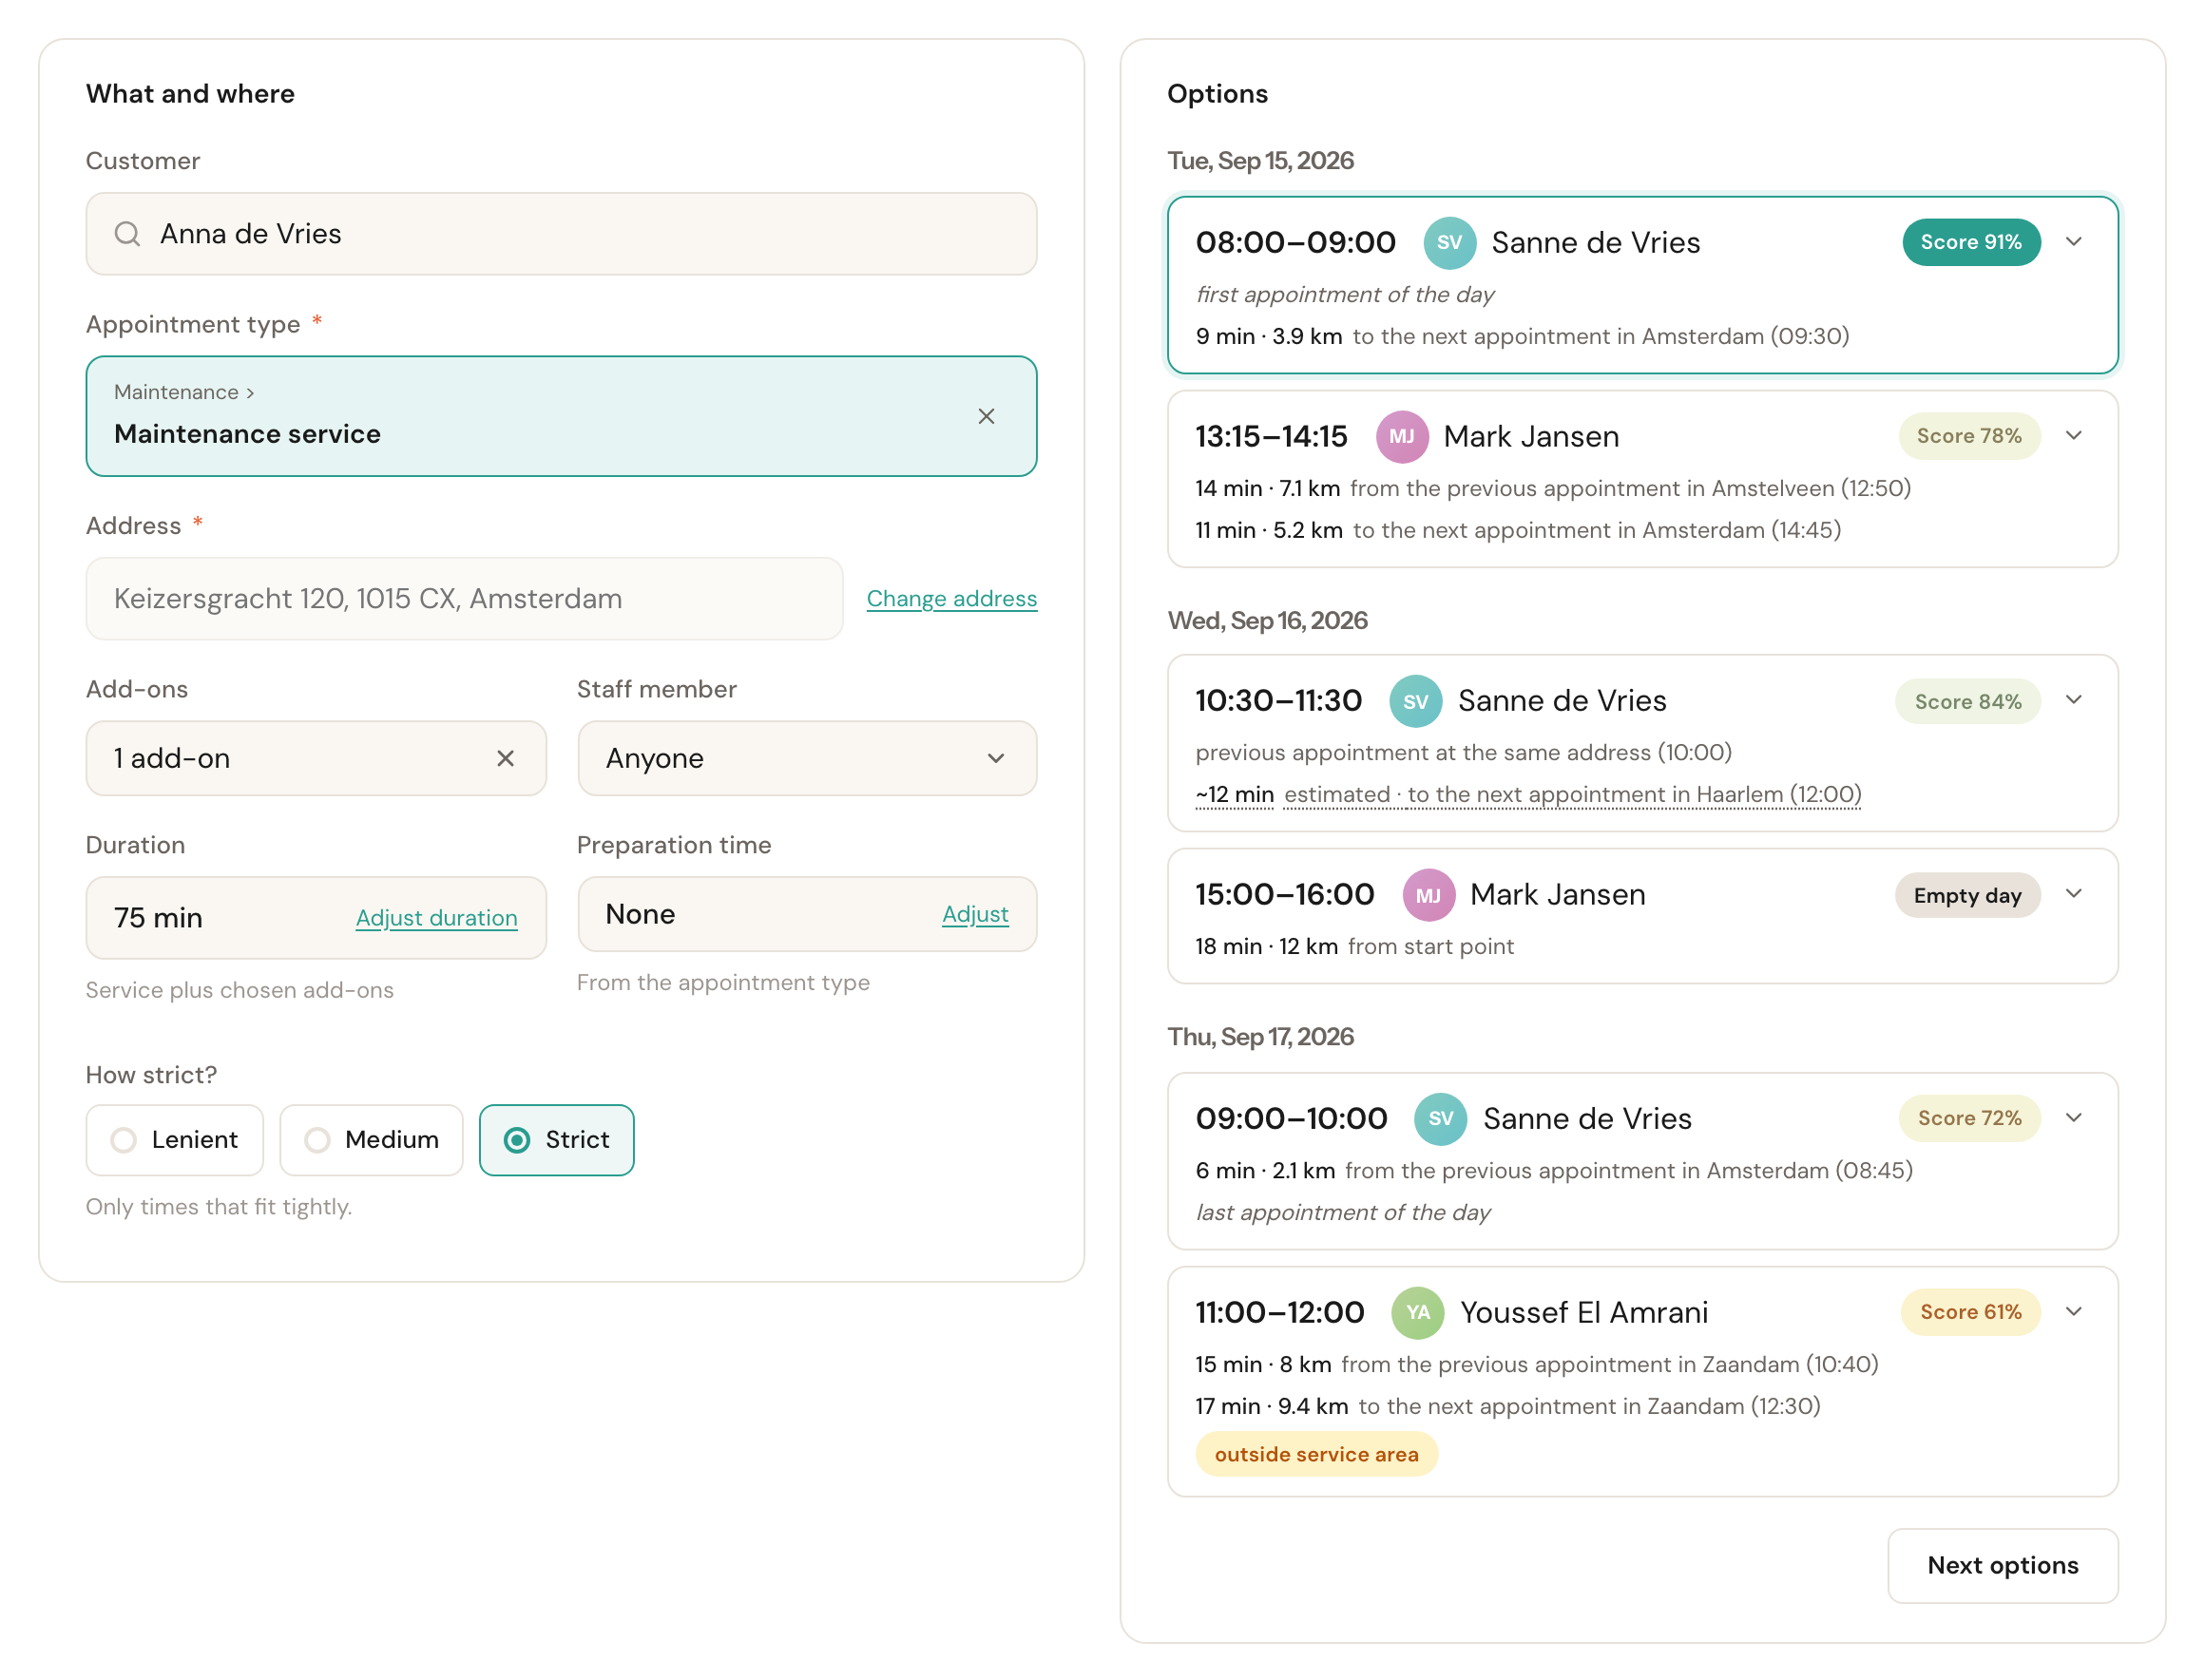
The question on the left, the answer on the right. Every change on the left searches again straight away.
Where to find the planner

The Find options button sits in the calendar toolbar, next to Create appointment. The same button is at the top of Appointments → Overview. The planner needs the same right as creating an appointment; without it, the page does not open.
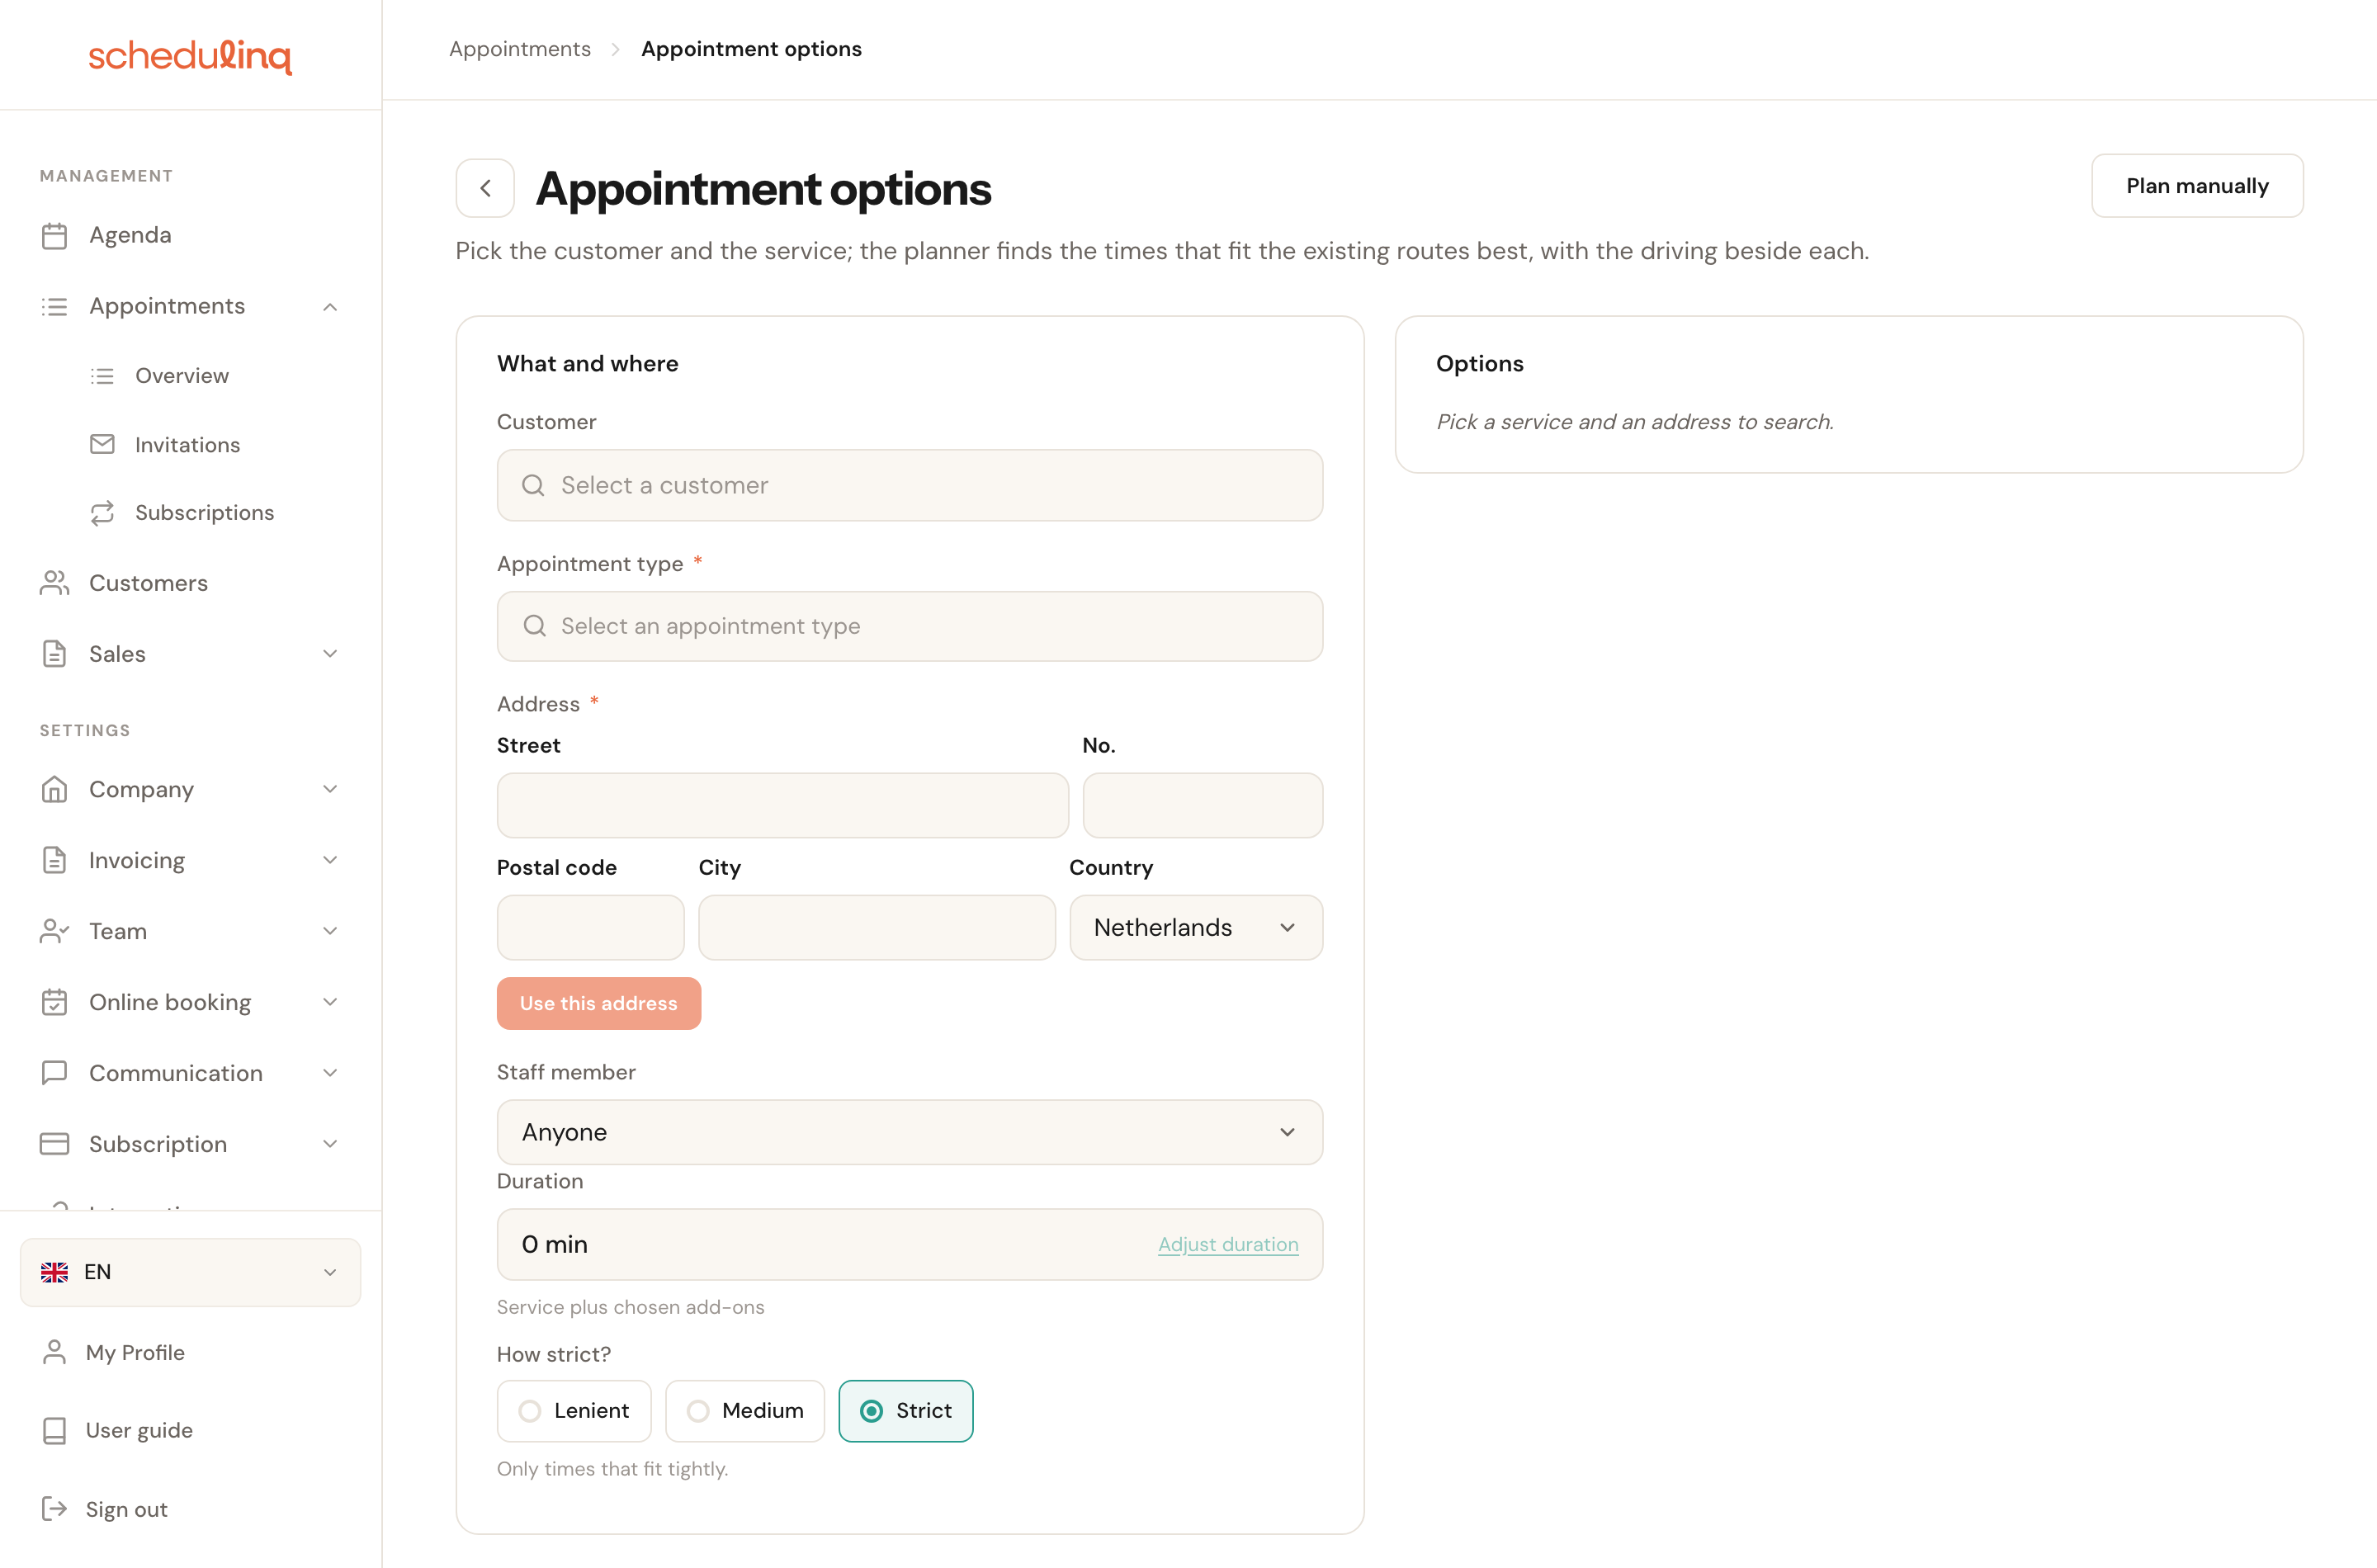
To go round the planner, Plan manually at the top right of the page opens the ordinary appointment form, without a time.
The question: what and where
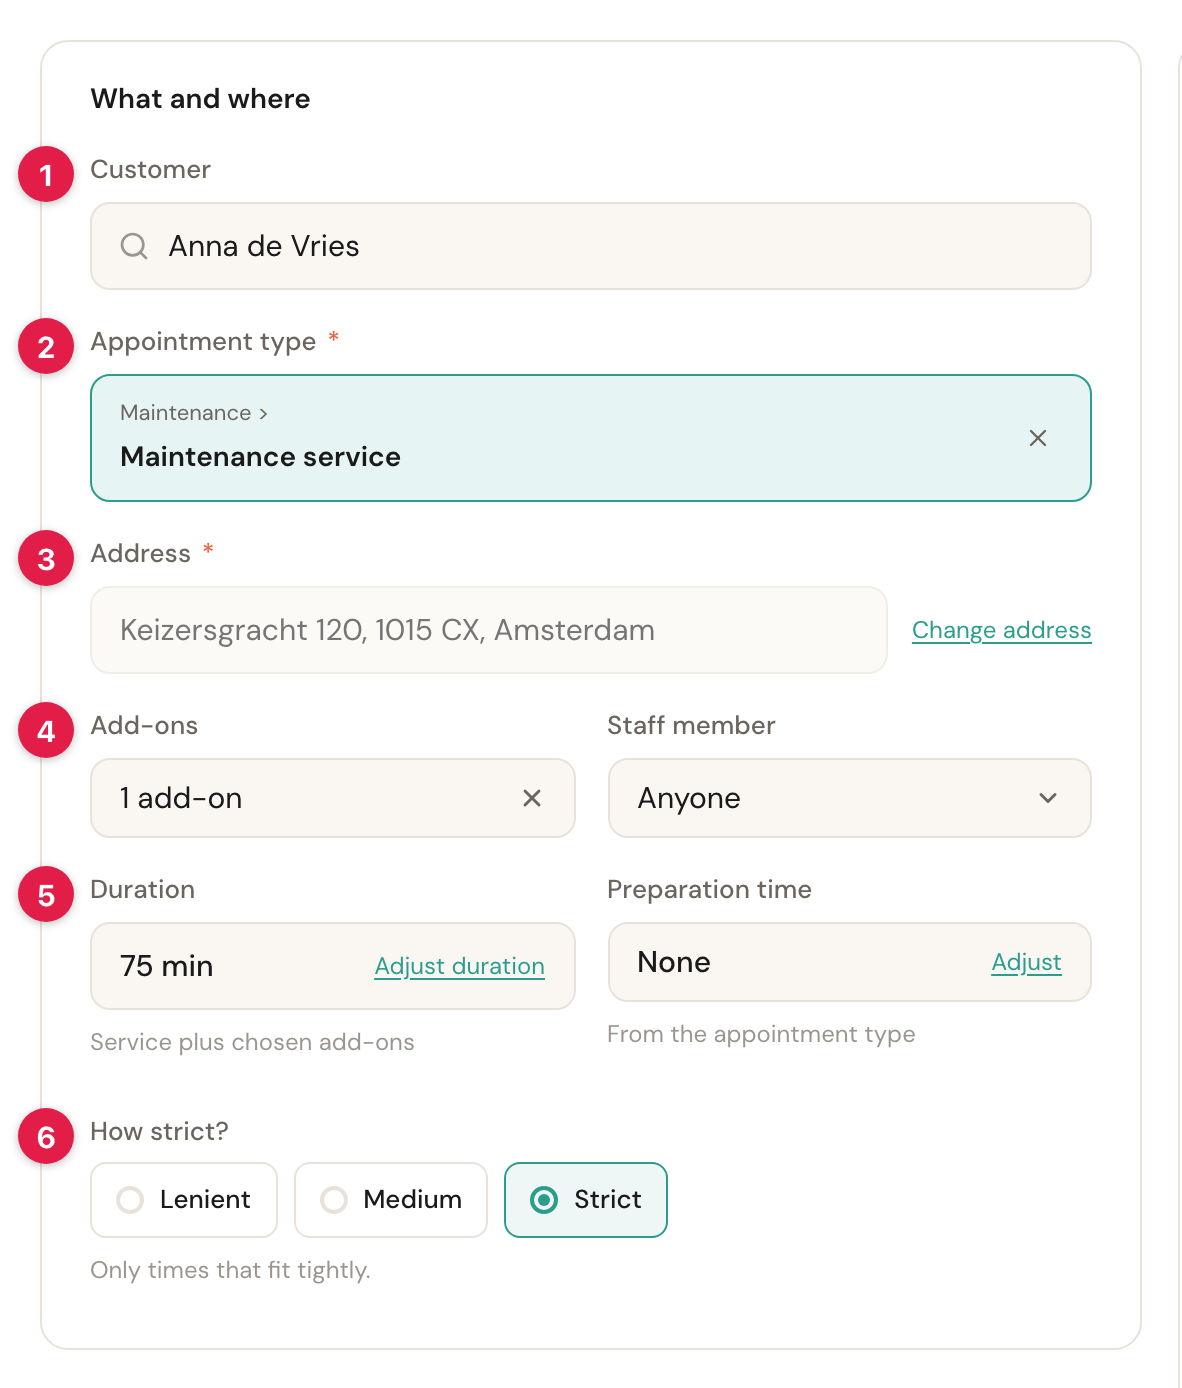
Customer
OptionalSearch by name, email address or phone number. As soon as you pick someone, Schedulinq takes the address from the customer record and starts searching.
A customer is not required, because the person calling is not always a customer yet. Leave the field empty and type the address yourself. Pick a customer later and they go along to the appointment form.
Appointment type
RequiredThe same three-step choice as on an ordinary appointment: first where — at the customer or at one of your locations — then the category, then the service.
The service decides who may carry it out, how long it takes and which add-ons can go with it. Pick a service at one of your locations and there are no address fields left to fill in: under Address you see the name and address of that location, and that is what the planner measures from.
Address
Required at the customerConfirm itThe address where the work happens. For a customer with an address it is there at once, as a single line. Change address opens the fields again, and Use this address confirms what you typed.
Nothing is searched until the address is confirmed — not while you are still typing. Schedulinq looks the address up on the map and stores it, and you do not want that for every half-typed street name along the way. While the fields are open, the right-hand side says exactly that: confirm the address to search for options.
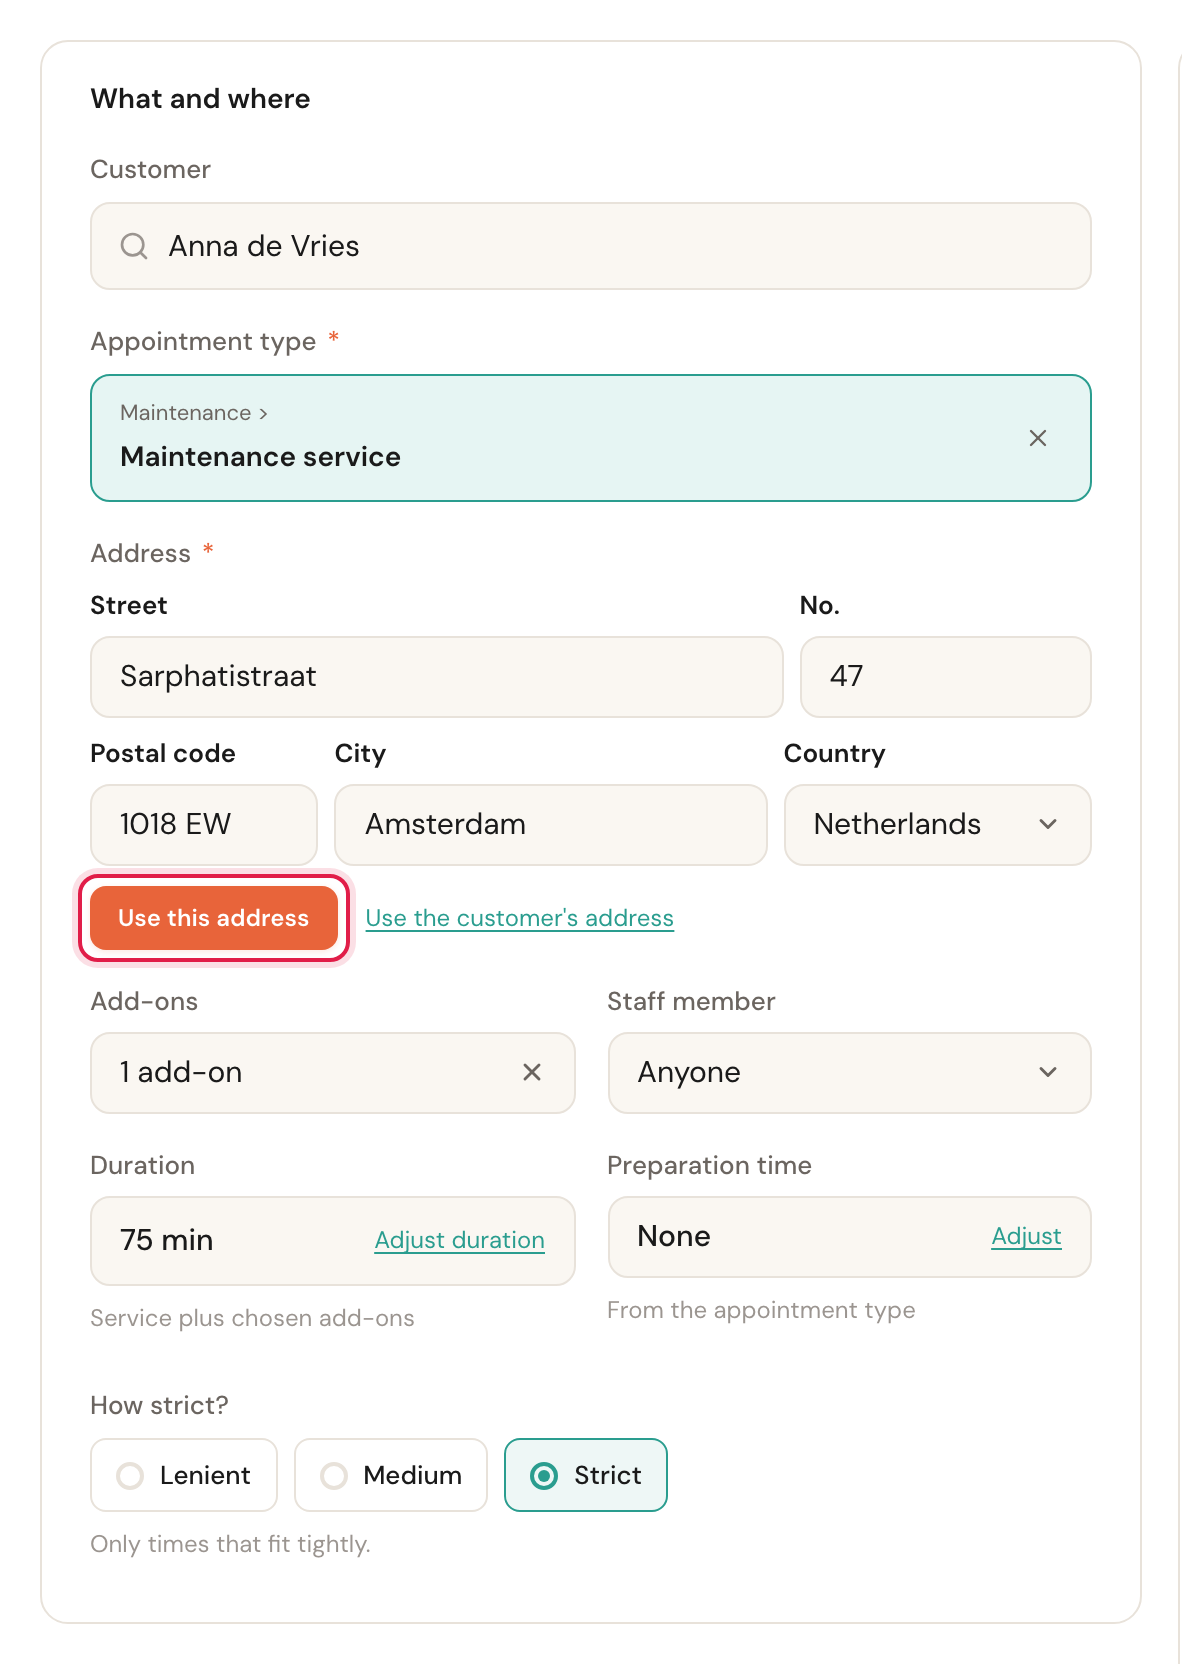
If the typed address differs from the one on the customer record, Use the customer's address appears beside it to jump back.
Add-ons
If the service has anyA compact picker with the same list as on the appointment form. Tick what needs adding; on an add-on with Multiple units you set the count on its row.
An add-on does two things to the search: it makes the appointment longer — that many times over, with multiple units — and it narrows who can do the appointment to the colleagues who carry out that add-on too. Both change which times fit, so the planner searches again after every change.
Staff member
Default: AnyoneLeave it on Anyone and the planner searches across your whole team, naming the person on every option. Pick one colleague and you see only their times.
Anyone is almost always the better answer: the best slot often sits in someone else's route than the person you had in mind. Narrow it to one person only when the customer specifically asks for them. You see this field only if you may see the whole team's appointments; otherwise the planner searches your own calendar.
Duration
AutomaticThe service's duration plus the chosen add-ons. Adjust duration lets you type a number of minutes; Automatic puts it back.
The planner looks for a gap of exactly this length, and passes that length on to the appointment form. If you know this visit will run long — an old installation, awkward access — adjust it here rather than on the form: otherwise the appointment no longer fits the slot the planner offered you.
Preparation time
From the appointment typeThe minimum number of days ahead an appointment has to be, taken from the appointment type. Adjust overrides it for this search.
An emergency visit may be tomorrow even if the type normally needs three days' notice: set it to None. It works the other way too: if the preparation time falls beyond the four weeks the planner searches, it says so and offers a button to search from the first possible date.
How strict?
Default: StrictThe bar a time has to clear to be shown. Under the buttons, one line says what the chosen setting means.
Strict shows only times that fit tightly around what is already there — little driving, but little choice. Medium drops the times with too much driving. Lenient shows almost everything. The planner starts on Strict, whatever you set for your booking page: you see the score and the driving beside each option, so you can decide for yourself whether a middling time is worth it. If Strict finds nothing, go one step looser before changing anything else.

The answer: options
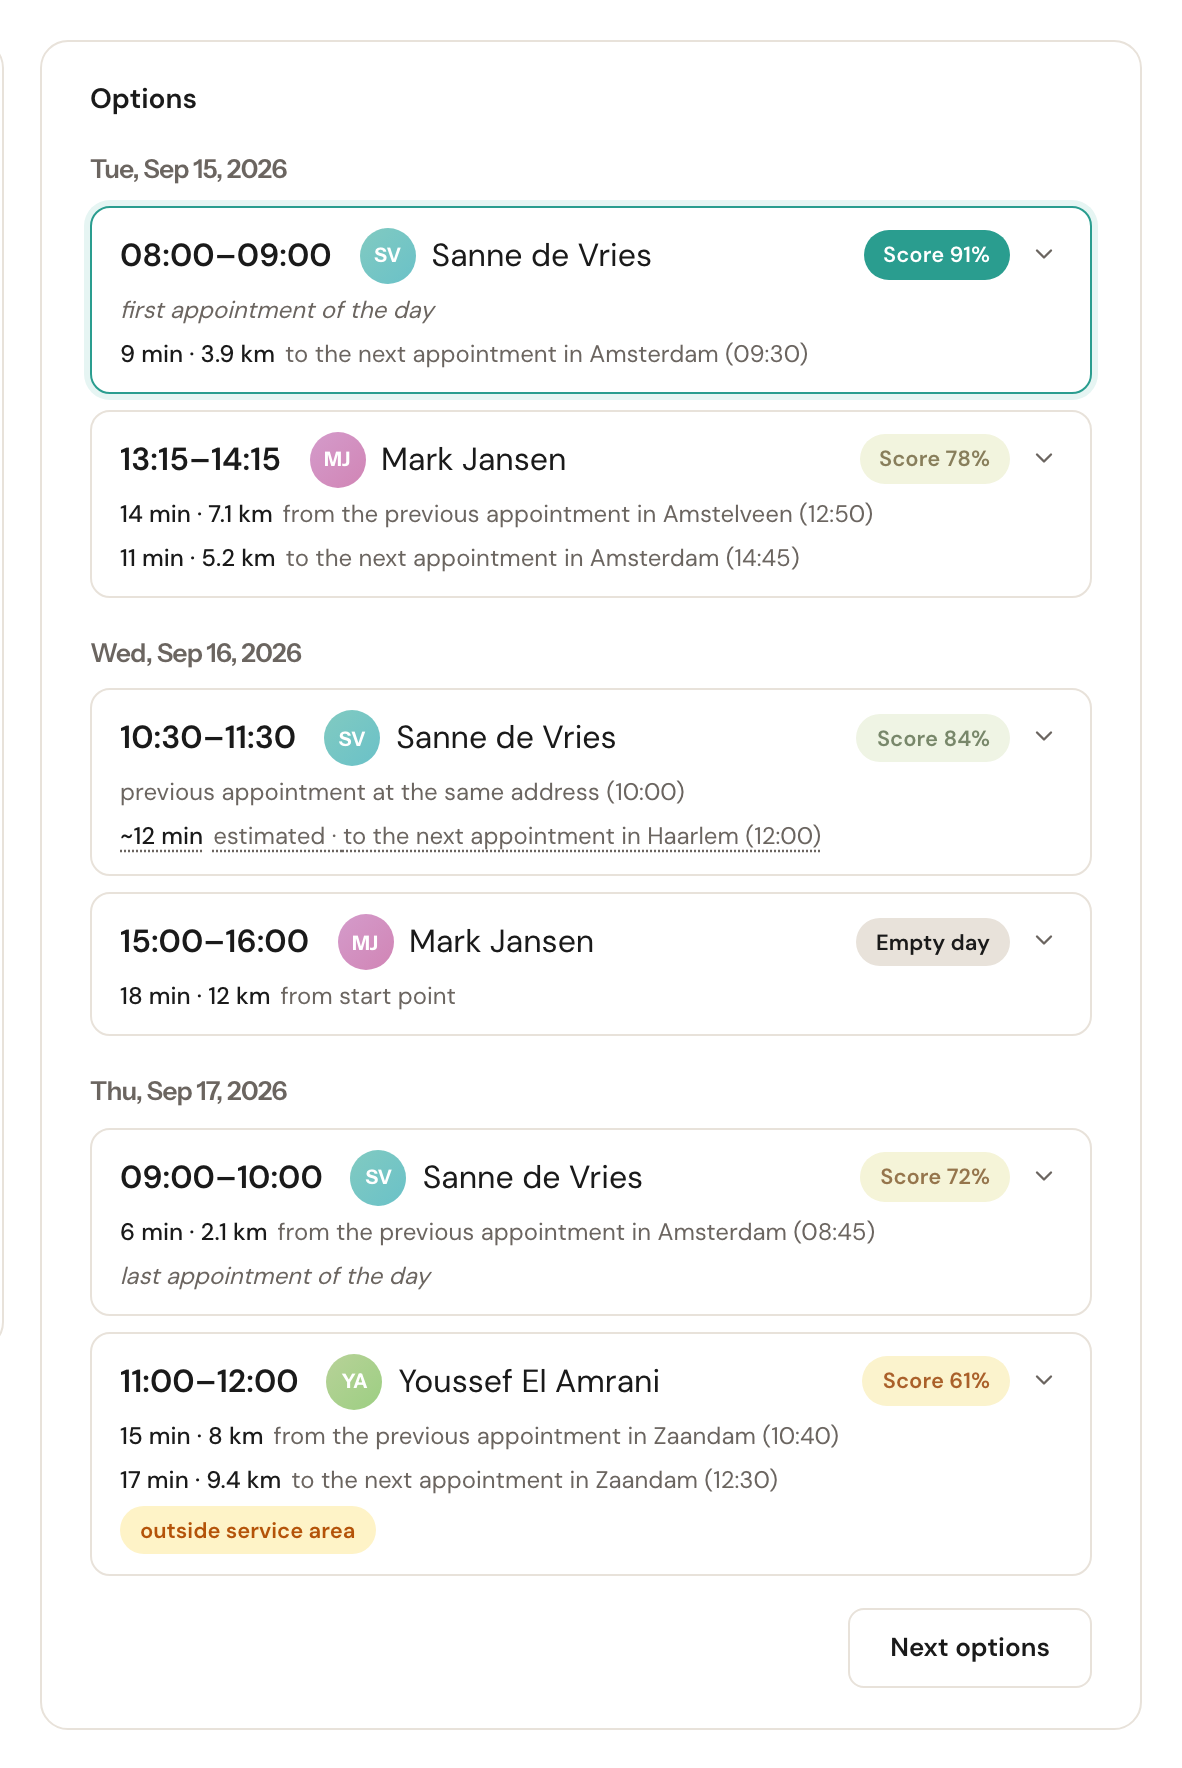
The times are grouped by day, and each row reads from left to right:
- The time the appointment would start and end.
- Who does it.
- The score, as a percentage. The higher, the better the time fits the existing route. The colour says how far the row sits above the chosen bar: green is comfortably, yellow is only just. The best row in the list gets a green frame.
- The drives this time causes, one line each: 14 min · 7.1 km from the previous appointment in Amstelveen (12:50) and 11 min · 5.2 km to the next appointment in Amsterdam (14:45). You see the town and the time of the neighbouring appointment, never that customer's name.
A few more things a row can say:
| What it says | What it means |
|---|---|
| first appointment of the day / last appointment of the day | Nothing else on that side. The drive from or to the start point does not count as "driving caused by this appointment" — it happens anyway — and sits behind the chevron. |
| previous appointment at the same address | The colleague is already there: two appointments for one customer, or two neighbours. No driving. |
| ~12 min · estimated | The route could not be worked out exactly; this is an estimate, without kilometres. |
| no driving | A service at one of your locations, on a day the colleague is there anyway. |
| Empty day | This colleague has nothing on that day yet. There is no fit to measure, so instead of a score you see how far the address is from the start point. |
| outside service area | The address is outside this colleague's service area. The booking page would not offer this time; you may still pick it. |
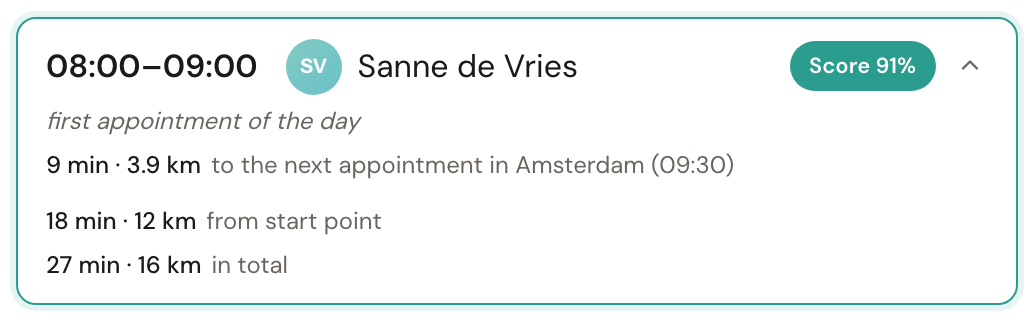
The chevron on the right of a row opens the rest: the drives from and back to the start point, and the day's total.
Looking further
The planner searches four weeks and shows the six best times in them. Next options gives the six after that, in order of score; once that window is used up it moves on to the four weeks after. Previous options goes back.
From option to appointment
Click a row. The ordinary appointment form opens with everything the planner knew already filled in: the customer, the service, the date and time, the staff member from that row, the add-ons with their counts, the address and the duration.
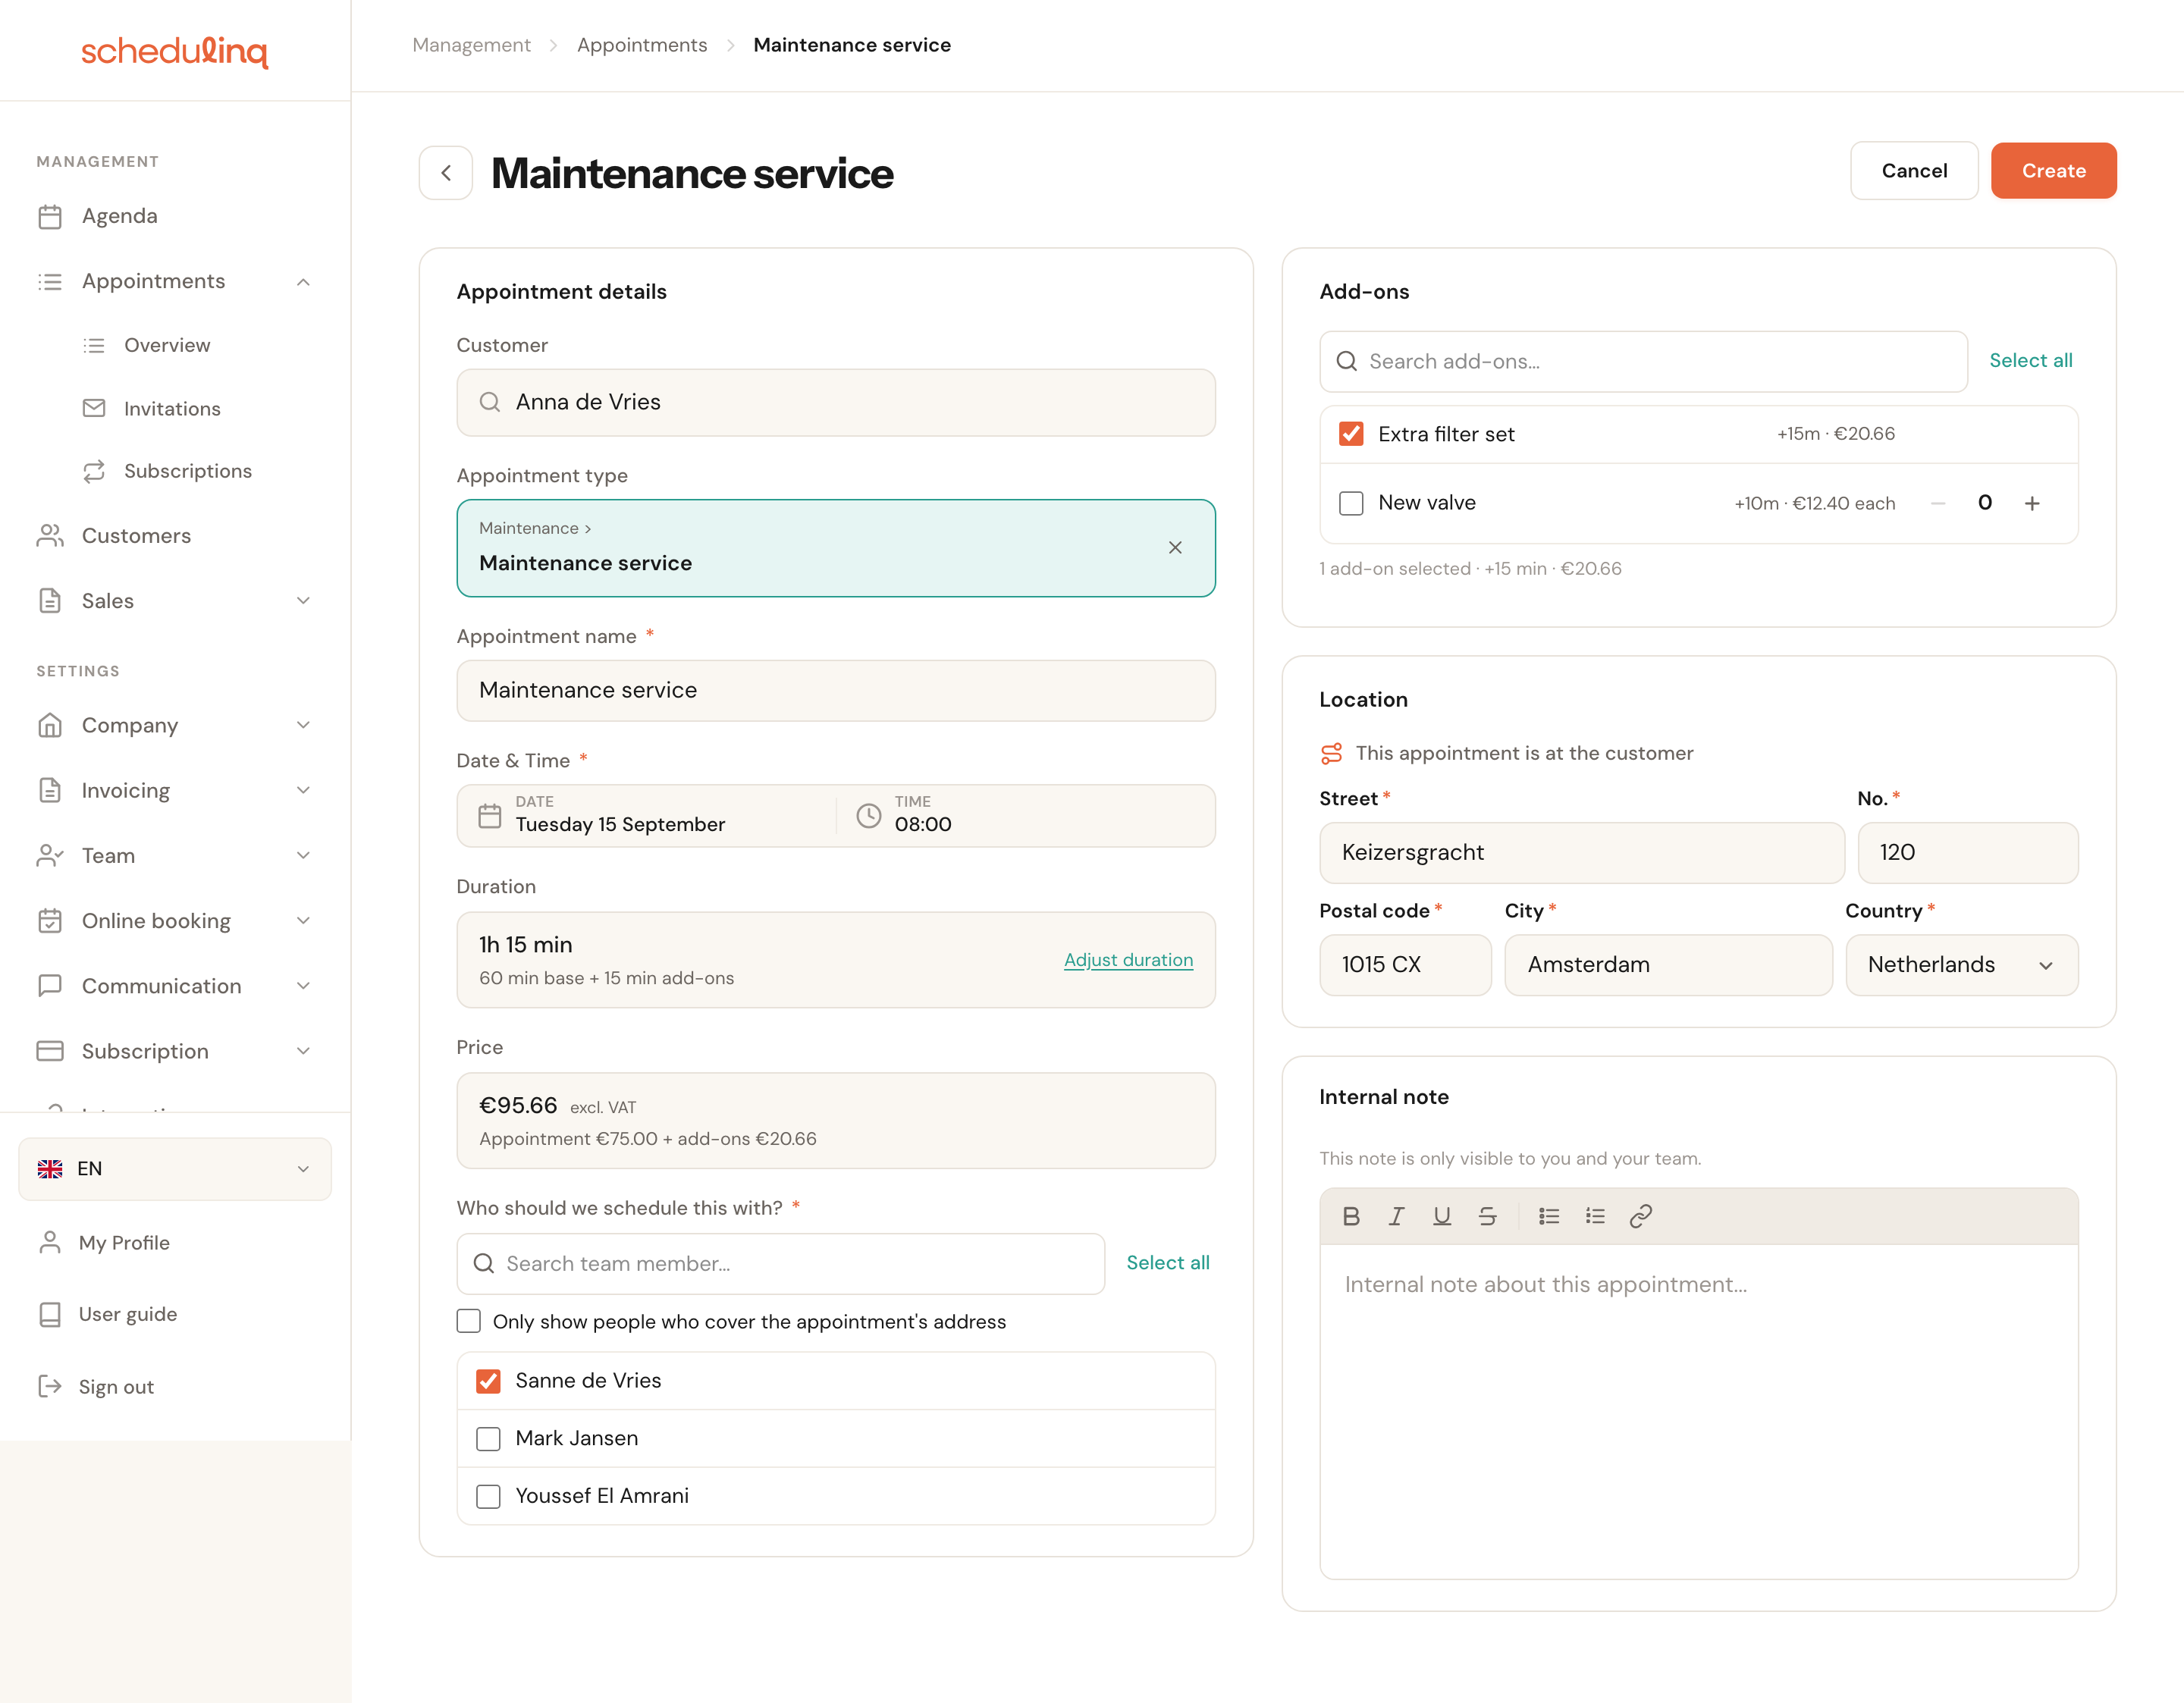
Nothing is booked at that point. You check, change what you like, and click Create — exactly as when you schedule an appointment. Schedulinq then asks, as always, whether the customer should get a confirmation.
When nothing comes out
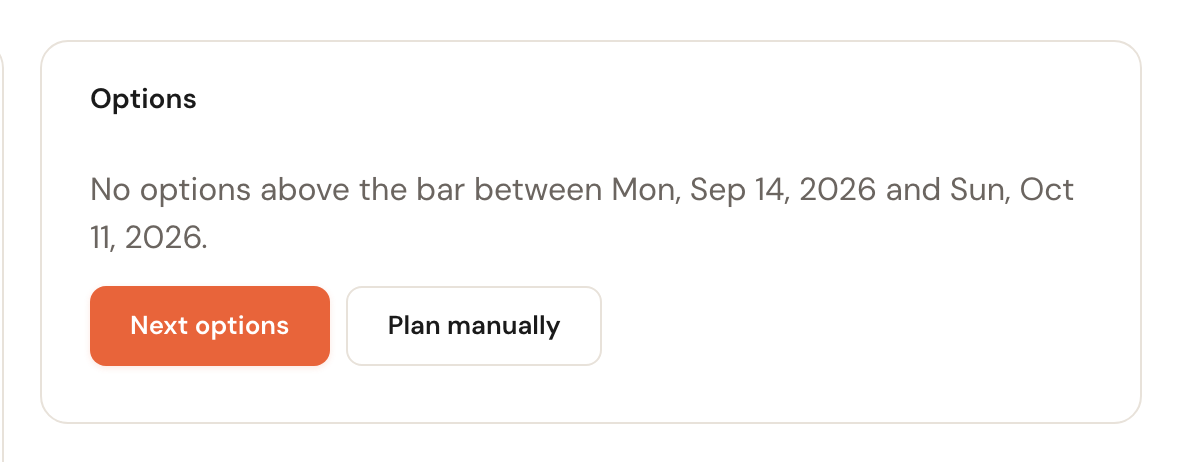
No options above the bar. There were times, but none of them cleared the chosen strictness. Three ways out, in this order: Next options looks four weeks further; one step looser under How strict? shows the times that were just under the bar; Plan manually opens the form and leaves the choice to you.
Nobody is assigned to this service, no single staff member can do all the chosen add-ons, nobody works at this location according to the roster — these are not search results but settings. The planner cannot find anything then, whatever you do to the strictness. Look at the appointment type, the add-on or the schedule.
The preparation time falls outside this period. The first possible date is more than four weeks away. The Search from button for that date jumps straight there; or set the preparation time to None for this one search.
This address was not found. Check the street, house number and town, and confirm again.
Slow down. You have searched a great deal in a short time — every change is a search. Wait a moment and try again.
Frequently asked questions
Why do I see a time tagged outside service area? Because the planner searches for you, not for the customer. On the booking page a customer outside your service area gets no times; you may decide for yourself that this customer is worth it. The tag says for which colleague the address is outside the area — with per-staff service areas that can differ from row to row.
Why do I have to confirm the address? I did not have to for the customer. The address on the customer record is already known, so it is confirmed at once. An address you type yourself is only looked up and stored once you say it is right.
The planner shows different times from what my customer sees on the booking page. Correct. The planner starts on Strict while your booking page follows its own setting, it searches across all your staff, and it shows the best times of four weeks rather than a few per day.
Can I pick a time that is not in the list? Yes. Plan manually opens the form without a time; you fill in a moment yourself, as always.
I see no customer field, only address fields. Then your role may not search all customers. The planner still works: type the address and confirm it.